The key objective of this getting started guide is to help the institute’s IT infrastructure or computer lab in-charge to configure the My sCool Server and make it available as a teaching and learning tool for the teachers and students within a few minutes.
Follow the steps below to get started with the My sCool Server (MSS).
Unbox the MSS
Unbox and take out the My sCool Server appliance from its packaging and store aside the packaging as it may come handy in the unlikely event of having to return the MSS.
Check Package Contents
- One My sCool Server appliance
- One power adapter with multi-country plugs
- VESA mounting hardware
- Hardware OEM Safety and Regulatory Information documents
- One Getting Started Guide in English & in your regional language (optional) i.e. printed copy of this document
If any items from the package are missing, please contact support@myscoolserver.com immediately. Do quote the MSS ID (S/N) present at the bottom of the MSS when reporting the same.
PrerequisiteThe MSS has the following pre-requisites –
Technical Pre-requisites:
- All end-user computers should meet the minimum configuration requirement of Dual Core CPU with 2 GB RAM and an ethernet/LAN port that is capable of PXE booting i.e. booting over the network.
- All the end-user computer systems should be connected over a wired Local Area Network(LAN). It is recommended that all the machines are connected by a wired Gigabit LAN.
If a lab setup does not meet this prerequisite and the MSS is shipped with a networking kit, then refer to the accompanying instructions for its appropriate deployment before proceeding any further with this guide.
Pedagogical Pre-requisites:
The instructional books used to teach the computer subject should be OS neutral i.e. emphasize on computing concepts more rather than on tools. They should preferably be referencing open source technologies. The MSS has almost all such tools built in, hence there shall be a natural curriculum adherence.
Connecting the MSS
Related video: YouTube page opens in new window
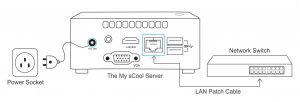 Connecting the My sCool Server
- Ethernet Connection – Connect one end of the crossover (CAT 5e/6 recommended) UTP cable into the ethernet port on the back panel and the other end to the ethernet switch
- Connect the AC Power connector into the back panel of the appliance and the other end into a standard AC receptacle & turn on the power.
Planning the Configuration
Before proceeding ahead, one has to ascertain the network mode (Static or Dynamic) in which to configure the MSS.
If the target network already has a DHCPDynamic Host Configuration Protocol server serving IP address to devices connected on the LAN then one needs to configure the MSS in Dynamic mode. If no such DHCP server exists, one may start by using the MSS in the default Static mode and should directly skip to the section titled – Network Booting of End User Computer Systems.
It is safe to assume that in majority of cases where a new network has just been setup for the purpose of installing the MSS, there is no pre-existing DHCP server, hence one may safely opt for Static mode.
Details of how to configure in Static or Dynamic mode are in the next section.
Note: If the target network on which the MSS shall operate is connected using a Managed Switch, then do contact your network administrator and ensure that ‘packets are allowed to flow for communication over DHCP and TFTP ports’ before proceeding ahead.
Configuring the MSS
Related video: YouTube page opens in new window
The MSS ships with a default configuration with a customised operating system pre-installed with several educational software and is immediately ready to be used.
While booting, one can manage the interface through a USB keyboard and a VGA monitor.
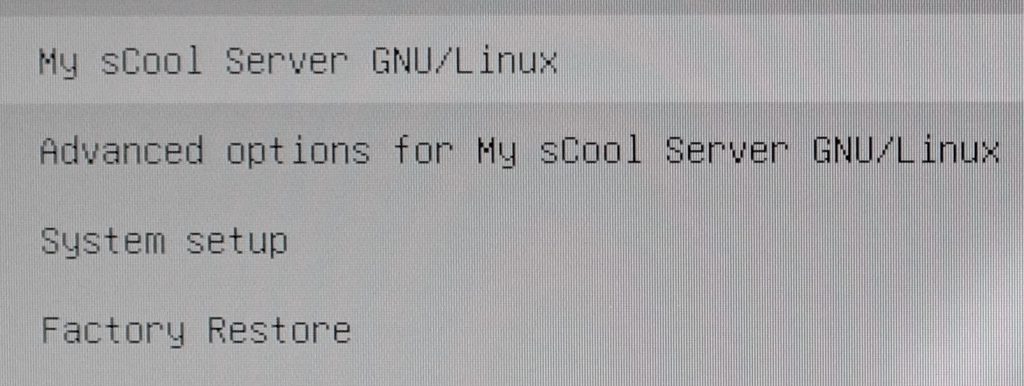
My sCool Server boot menu
One is presented with the above menu at the beginning of the boot cycle. From this menu one can reinstall, run utilities, or troubleshoot general problems.
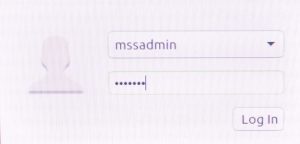
MSS login screen
The default administrator user and password on MSS is mssadmin and myskool which must be used to gain admin level access.
After login, edit the connection that would not be used and uncheck “Automatically connect to this network when it is available” to disable auto-connection attempts in the undesired mode. For example, herein below are the steps to disable ‘Dynamic’ and enable ‘Static’ mode.

Network Manager – Edit Connections
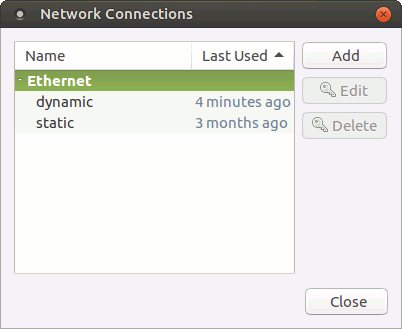
Network Connections – Select the desired connection and click Edit
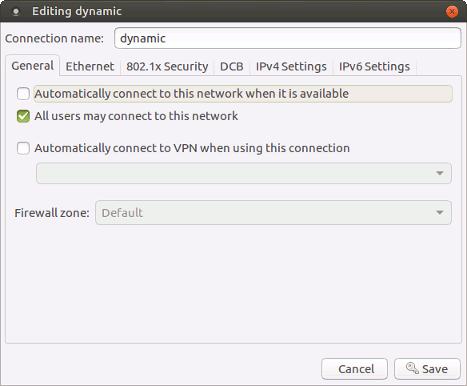
Uncheck ‘Automatically connect…’ to switch off dynamic mode
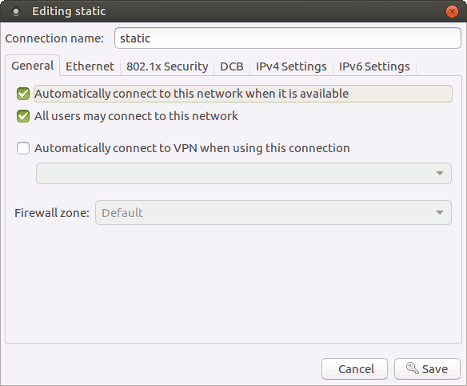
Check ‘Automatically connect…’ to switch on static mode
Finally, choose “static” in the Network Manager menu and the MSS is now operating in static mode.
That is all one needs to do to configure the MSS.
Network Booting of End User Computer Systems
Related Video: YouTube page opens in new window
Since it is not possible to cover the exact steps as per each system’s BIOS layout and key combinations as they vary for each hardware OEM, herein are the broad steps of what needs to be done to enable network booting capability in your end computer systems.
- The BIOSBasic Input/Output System/Setup can be accessed by pressing ‘Del’ or ‘F2’ at the very beginning of the boot sequence in majority of the systems.
- Locate the Boot Menu settings and enable Network Boot option if it is not already enabled. Press F10 or equivalent key as per the BIOS instructions to save the settings.
- One may have to turn off Secure Boot and UEFI boot mode and switch to Legacy boot mode for most current generation systems.
- Choose the Network Boot option as the first priority in the boot sequence. One may need to reboot after step 2 to make the Network Boot option visible in the boot sequence. Press F10 or equivalent key as per your BIOS instructions to save the settings.
- Reboot the system after ensuring that it is firmly connected to the network with an ethernet cable.
Refer to the system motherboard’s manual to perform the necessary steps to achieve the desired result if the above do not suffice.
The client system should initiate the boot sequence similarly as shown in the below screenshots and should eventually land at a user login screen –
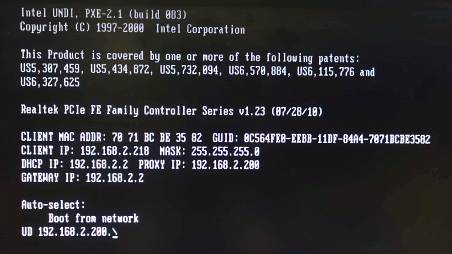
Client boot sequence initiation
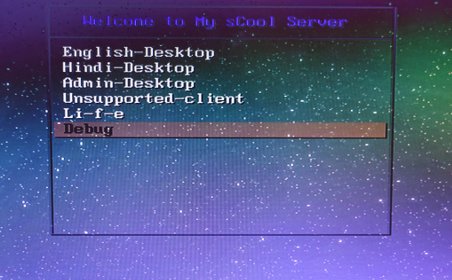
Client boot menu
Boots automatically into the preselected option i.e. English-Desktop, unless an alternate option is selected using the arrow keys followed by enter within 5 seconds.

Client login screen
Once fully booted, login using one of the pre-configured teacher or student accounts. If an institute has not specifically requested for custom accounts then the MSS comes preconfigured with 100 student: student1 to student100, password: 12345; and 10 teacher: teacher1 to teacher10, password: imteacher; accounts. In case of custom accounts, do refer to the related communication with your purchase in-charge.
Once the end client systems are booting satisfactorily, one may disconnect the keyboard, mouse and monitor from the MSS as one can administer it through any of the client systems by booting in Admin-Desktop mode and logging in with the mssadmin user credentials.
Troubleshooting: Though highly unlikely, if for any reason the end user computer systems do not start with the above depicted boot sequence, restart the MSS after completing the steps in ‘Configuring the MSS’ section and then reboot the end user systems.
Creating First Restore Point
Related Video: YouTube page opens in new window
Once the end client systems are booting fine, it is time to create a point-in-time backup a.k.a. restore point a.k.a. snapshot.
Multiple snapshots can be created and is only limited by the space allocated to the /recovery partition. Herein, we are use a data deduplicationIn computing, data deduplication is a specialized data compression technique for eliminating duplicate copies of repeating data. Related and somewhat synonymous terms are intelligent (data) compression and single-instance (data) storage. Source: https://en.wikipedia.org/wiki/Data_deduplication backup technique to optimise and minimize storage utilisation.
Open a terminal by right-clicking on the desktop and run the following commands to create the first restore point after configuration of the server :
sudo -s
Enter the mssadmin password when prompted for it. This shall elevate the shell to root permissions.
recovery.sh create
Basic Security
Related Video: YouTube page opens in new window
After the initial setup, one should change the password immediately for the mssadmin user.
Congratulations & have fun!!
This concludes the one-time configuration of the MSS. Herein begins a fantastic journey of the teachers and students wherein all teach and learn while having fun.
Seeking Support
MSS will have a sticker at the bottom, indicating the MSS ID (S/N) of your MSS. This ID is important for all communications with Recherche Tech in regards to your MSS hardware. If you ever have an issue with your MSS hardware and it is under warranty, simply open a ticket through any of the support channels and quote this MSS ID and the nature of your problem.
What next
We recommend that the computer lab incharge and/or the computer teacher read the extremely helpful manual available online or offline when connected to the MSS at https://server/ via a browser.
We urge you to engage through the below channels to maximise your gains from the My sCool Server.
Frequently Asked Questions – https://www.myscoolserver.com/faqs
Helpdesk – https://helpdesk.myscoolserver.com